Combat
Your initial fleet will contain several ships that have a spatial early warning (SEW) capability that allows detection of out-of-system fleets within a certain range. The range is visible on the cluster view by a green circle surrounding the location of your fleets. The SEW capability of different ships is not additive within a single system, so only the highest range will be shown on the map. If fleets with hostile intentions enter space within this circle you will be alerted and the clock will slow down to real-time to give you a chance to react. Silence the alert by selecting it from the faction alerts tab and click the pause ![]() icon.
icon.
In the example below a hostile fleet is approaching a friendly system via transfuse deep-space jumps (deep space locations are shown with an ID beginning with DS on the cluster view). The fleet can be selected by left-clicking the deep-space location. On selecting the hostile fleet an icon will show on the cluster view indicating the size and designation of the fleet. In this case a relatively small military fleet. The fleet will also be surrounded by a blue circle which represents its detected jump radius, which is how far it travel in a single transfuse jump. In the example below the hostile fleet can be expected to enter our system on its next jump.
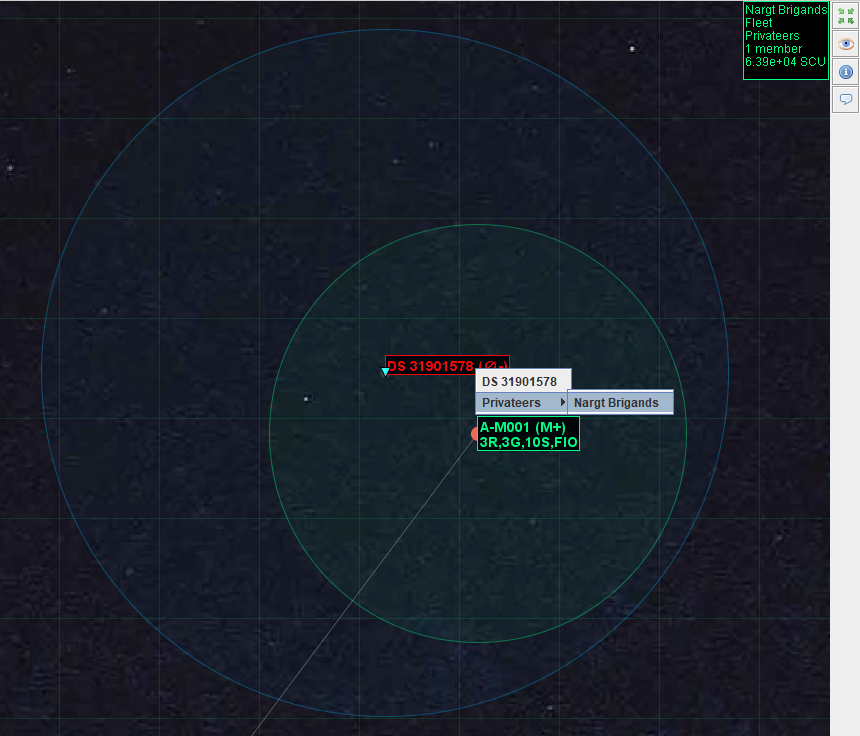
As the fleet is within SEW range we can also use the information ![]() icon to view the composition of the fleet and gauge its threat. In this instance it is a Privateer fleet, which is independent from any of the main factions in the game and can attack or be attacked with impunity. As the privateers lack (official) support of a major faction their fleets tend to be small and they seek to pick off lone or weak targets. If you have not yet created a dedicated defence fleet in this system, do so now.
icon to view the composition of the fleet and gauge its threat. In this instance it is a Privateer fleet, which is independent from any of the main factions in the game and can attack or be attacked with impunity. As the privateers lack (official) support of a major faction their fleets tend to be small and they seek to pick off lone or weak targets. If you have not yet created a dedicated defence fleet in this system, do so now.
If your defensive fleet has jump capabilities you could attempt to interdict the opposing fleet before it enters your system by commanding your fleet from the cluster view to intercept the privateer fleet. Given that this particular privateer fleet is expected to reach your system in its next jump (it has a very good jump range) it may already be too late for this to happen, and in any case it may not be wise to leave your home system otherwise defenceless in case another hostile fleet approaches from another direction before you have time to get your fleet back.
Increase the clock rate again and wait for the opposing fleet to enter your system. Another alert will be generated when the fleet enters a system you occupy and the clock rate will again be slowed down to real-time to give you a chance to respond to this escalation in threat. Your system will now be highlighted in red on the cluster view to indicate the presence of a hostile fleet.
Find the opposing fleet in the system view. As it is arriving from deep space it will be located somewhere in the outer reaches of your system which may require zooming out. Select the local defence fleet and use the command ![]() icon and left-click the opposing fleet and select Intercept. A red line will now be displayed from your fleet to the opposing fleet to indicate the intention to intercept.
icon and left-click the opposing fleet and select Intercept. A red line will now be displayed from your fleet to the opposing fleet to indicate the intention to intercept.
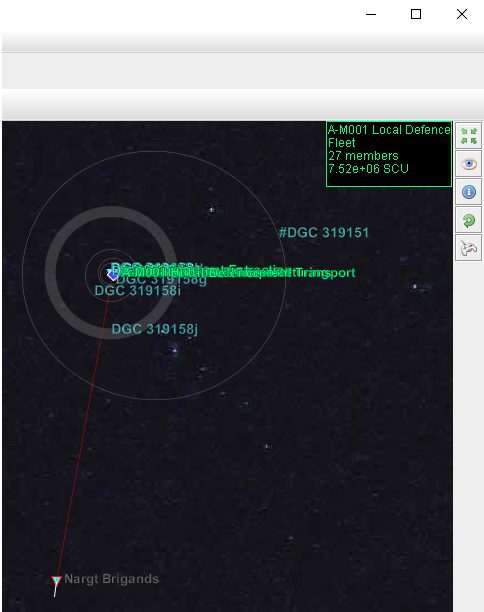
Increase the clock rate so that the defence fleet starts closing on the hostiles. If you detect more hostile fleets in the meantime it may be wise to hold your defensive fleet relatively close to your bases in case a new fleet enters from the other side of the system and reaches your undefended bases before you can get your defensive fleet back. Once your fleet starts getting close to the hostile fleet slow the clock down to give the AI the best chance of performing an interception (at high clock rates the system may glitch and miss an interception that would have succeeded at a lower clock rate).
As the fleets approach each other zoom in until you see a green circle around your fleet. In the game all the major races including yours have discovered the ability to displace materials near-instantaneously, but with a limited range that appears to be a fundamental constant. This range is represented by the green circle. The main limitation thus far is that no-one has been able to displace an active displacer itself, so ships cannot displace themselves directly to travel at insane speeds, nor try to leap-frog by using multiple active displacers. Displacers are highly sensitive machines and the time taken to bring one online and stabilize itself for safe use is much longer than the time that would be taken to travel across the displacer-horizon using a standard warp drive. The displacer tech is used by transportation fleets to displace cargo directly to and from your bases without needing to dock. Obviously this displacement ability has significant ramifications on combat where munitions are displaced directly into opposing fleets rather than having to be dispatched via warp drives. This form of displacement combat is universally used and given that the time to displace material is measured in in femtoseconds a typical combat is finished in less than a nanosecond with pre-loaded munitions being displaced by effectors into the opposing fleet and then new munitions immediately displaced into the effectors in incredibly short timescales. Clearly operating at such short timescales is beyond the ability of humans, so all combat is performed by a ship’s Soul. Thankfully displacers can be countered by various means to prevent unwanted munitions from being displaced inside your ships’ shields or hull, but they can still be displaced to impact nearby. Military ships are also equipped with various countermeasures to disguise their exact location in space and time so that not every displacement attack will necessarily hit the target.
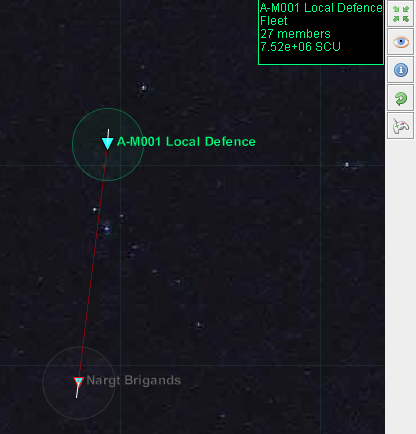
In terms of gameplay, combat is turn-based, with each turn representing a single displacement cycle. Whilst playing through a combat in turn-based fashion may take hundreds of turns, the game clock itself wont tick and to external human observers the losing fleet will vanish in an instant.
When the two fleets meet an audible warning will sound and you will be taken to the first phase of combat.
Formation Phase
The formation phase takes place some time before the engagement proper begins. It is your last chance to launch any ships that are docked with other ships in your fleet, or dock vulnerable ships that might be better protected inside carriers. Once combat begins docked ships will be unable to take part in combat, as the combat itself will take place in too short a timespan to launch or dock more ships.

The [Commit] button will take you to the next stage.
Engagement
The engagement panel is shown below. Your fleet is shown on the left. The opposing fleet on the right.
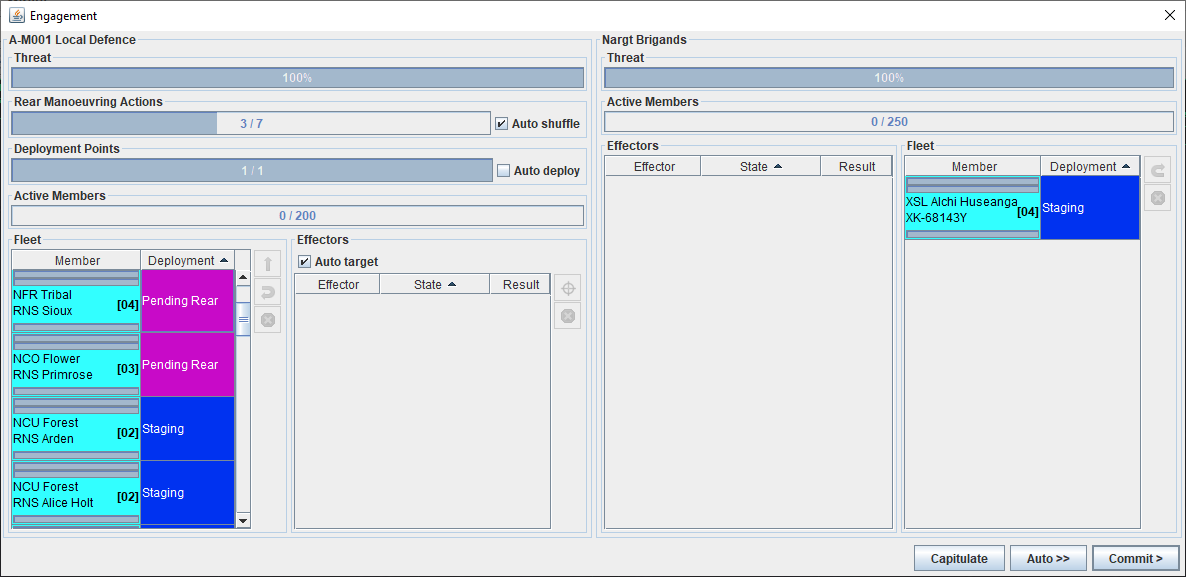
The Threat bar at the top is an indication of the remaining effectiveness of your fleet compared to the initial state. It will decrease as ships are disabled/destroyed
Your fleet members will be positioned in one of seven deployment states:
- Forward: the member is in the combat zone and can target or be targetted.
- Staging: the member is on the edge of the combat zone and can be deployed into it if desired, it may also be interdicted by the enemy and forced into combat.
- Rear: the member is behind the front lines and cannot enter combat yet, nor be interdicted.
- Pending Forward: the member has been scheduled to enter the combat zone on the next turn.
- Pending Rear: the member has been scheduled to rotate away from the staging area to the rear area on the next turn.
- Disabled: the member has been disabled by received damage. If your fleet wins it may be recoverable.
- Destroyed: the member has been completed obliterated and will not be recoverable after combat.
To deploy a fleet member to the Forward zone from the Staging zone you must spend deployment points. The deployment cost of each ship is shown in square brackets next to the ship class and name in the fleet table. The deployment cost is equal to the Hull class of the ship in question. At the start of combat you will only get one deployment point per turn, so only the smallest most nimble ships can be deployed when the fleets first engage. Unspent points will be accumulated to the next turn up to a maximum of four points carried over. Every four turns the number of deployment points granted per turn increases by one, so after four turns you will gain two deployment points per turn; after eight turns you will get three points per turn, etc. To deploy a ship select it from the fleet view and click the deploy ![]() icon. The deployment points will decrease and the ship will shift to Pending Foward. It is possible to enable Auto deployment by selecting the checkbox next to the deployment points. With this enabled the system will attempt to automatically deploy the best possible ships each turn.
icon. The deployment points will decrease and the ship will shift to Pending Foward. It is possible to enable Auto deployment by selecting the checkbox next to the deployment points. With this enabled the system will attempt to automatically deploy the best possible ships each turn.
If you attack with a non-trivially sized fleet only a random subset of it will be initially in the staging area and able to be deployed. As ships are shifted out of the staging area new ships will replace them from the rear area. If you have large ships in the staging area initially it is desirable to shift them to to the rear area by spending rear manoeuvring actions in the hope that a smaller ship that can be deployed will take its place. Each ship costs a single action point to send to the rear area, regardless of size. By default Auto shuffle is enabled which will automatically put ships that will not be able to be deployed for several turns into the Pending Rear state. This can be turned off by clicking the checkbox next to the rear manoeuvring action points display. To manually command a ship to manoevre to the rear select it from the fleet table and click the rear ![]() icon.
icon.
If you have deployment points left over in a turn, and the enemy has some vulnerable ships in the staging area then you can force them into the combat zone next turn by selecting them and clicking the interdict ![]() icon.
icon.
The buttons on the bottom of the window are used to progress or terminate combat. If [Capitulate] is chosen your fleet is immediately lost in its entirety. If combat drags on for too long without the opposing fleet making progress in destroying your fleet this might change to offer a [Stalemate] where both fleets will disengage in their current state. [Commit>] is used to advance combat by a single turn. Auto>> is used to automatically advance turns, with short pauses between turns to give you a chance to retake control.
Once both fleets have members in the Forward area they can begin targetting each other with their effectors. Select a ship to view its effectors. Select an effector to use and then use the target ![]() icon to direct the effector at a member from the opposing fleet. It takes a single turn to change targets, whilst re-targetting the effector will display the state Tracking which will then flip to state Locked on the next turn. Selecting a fleet member will also show any opposing effectors that are targetting it. After each turn the result of any effector use will be displayed, including any damage inflicted.
icon to direct the effector at a member from the opposing fleet. It takes a single turn to change targets, whilst re-targetting the effector will display the state Tracking which will then flip to state Locked on the next turn. Selecting a fleet member will also show any opposing effectors that are targetting it. After each turn the result of any effector use will be displayed, including any damage inflicted.
Effectors come in four types
- kNE: Nova emission. Great against sheilds, less good against armour and hull.
- kAM: Anti-matter. Great against armour and hull, less good against shields.
- kEM: Electro-magnetic. Targets opposing effectors directly to try to disable them without causing damage to the ship.
- kPD: Physical dissociator. Attempts to damage the ship by disrupting the laws of physics in the space around the enemy ship. Needs to entirely crash the enemy shields first, but then attacks the hull directly bypassing any armour.
Effector size and number is displayed in the effector window. 1x14 indicates a single-barrel effector with a size of fourteen. A larger size effector can do more damage, but is also slower and less able to hit smaller ships. The ideal hull class an effector is optimized for is roughly one-tenth of its size. kPD effectors are exempt from this penalty as they are designed to affect relatively large areas of space, the trade-off being that kPD effectors do less damage for their size compared to kNE or kAM
Auto target is enabled by default where the system will try to use effectors to maximize expected damage (or maximize damage mitigation in the case of kNE effectors). This can be turned off by clicking the checkbox above the effector table
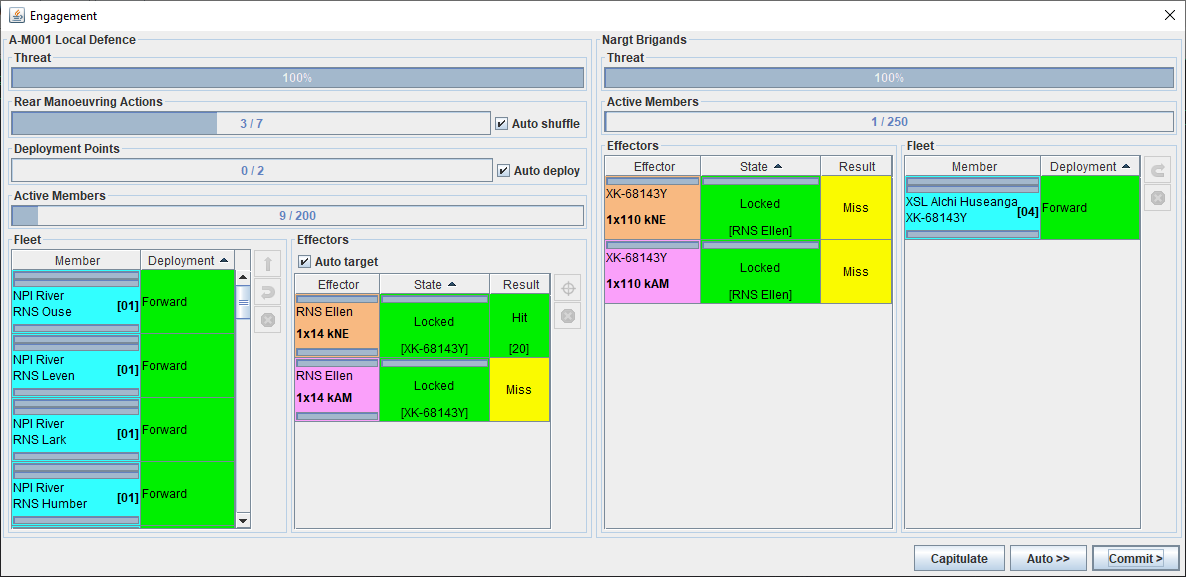
Each fleet member has three health bars around its name:
- The top bar is its current shield capacity, which may recharge a little each turn depending on its equipment.
- The second bar is its current armour capacity, which will not recharge in combat.
- The bottom bar is its hull status, a ship may become disabled at around 60% hull status, certainly destroyed at 40%, with some chance of destruction between those numbers, particularly for highly damaging strikes
Each effector also has a single health bar that represents its resistance to kEM attack. Effectors can be disabled from around 60%.
Whilst shields and armour have an overall capacity, their resistance to single hits is limited. It is possible for highly damaging hits to pass through both shields and armour and damage the hull long before the shields are crashed or the armour completely depleted. kPD effectors are an exception to this as defensive fields are particularly effective at neutralizing the effects of a physical dissociator and they do need to crash the enemy shields entirely before they can damage the hull, but once through the shields they bypass any armour.
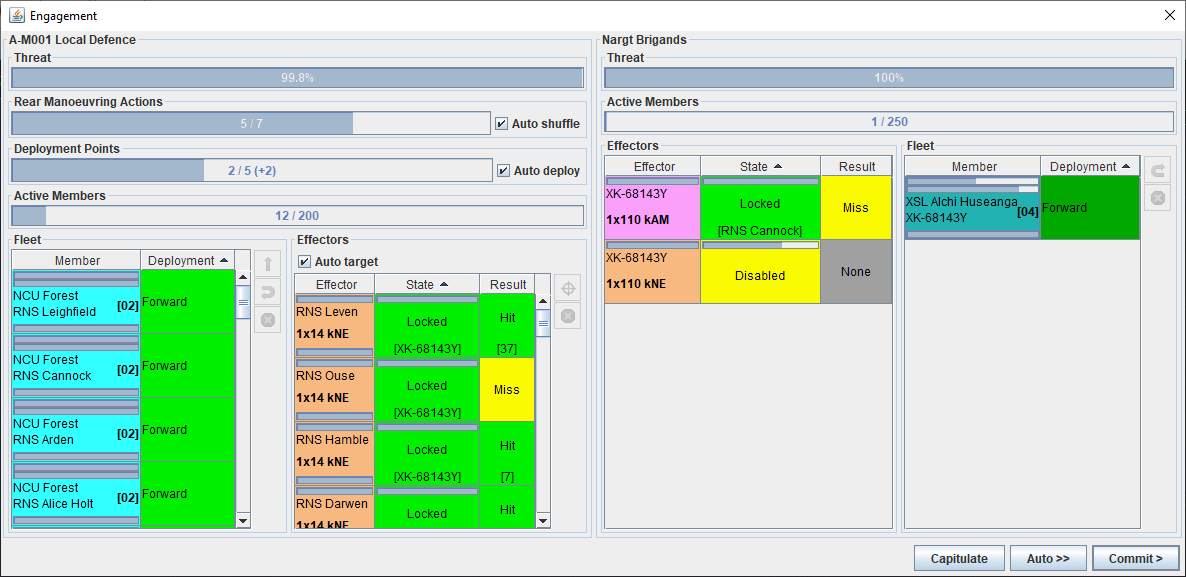
In the case of victory where the opposing fleet is entirely destroyed or disabled the combat will end and a [Loot] button will appear.

Loot
If the opposing fleet had members that were Disabled it may be possible to salvage them for use in your own fleet. Not all disabled ships will necessarily be available as some may have enough control left within them to self-destruct before their systems are disabled and replaced with your own. Ship capabilties in orange indicate that those systems have been damaged. In the example below the ship has a jump drive but has been damaged below its capacity to operate at all and has been reduced to a range of 0.00 and would need repairs before any jumps are possible. To salvage a ship select it from the top table and click the add ![]() icon.
icon.

Next is a screen to loot any cargo left over after the battle. This might include contents of any cargo ships, but will also include fragments of xenotech which can be used to research improvements in technology. Select the items you wish to take and transfer to your own fleet with the buttons provided.
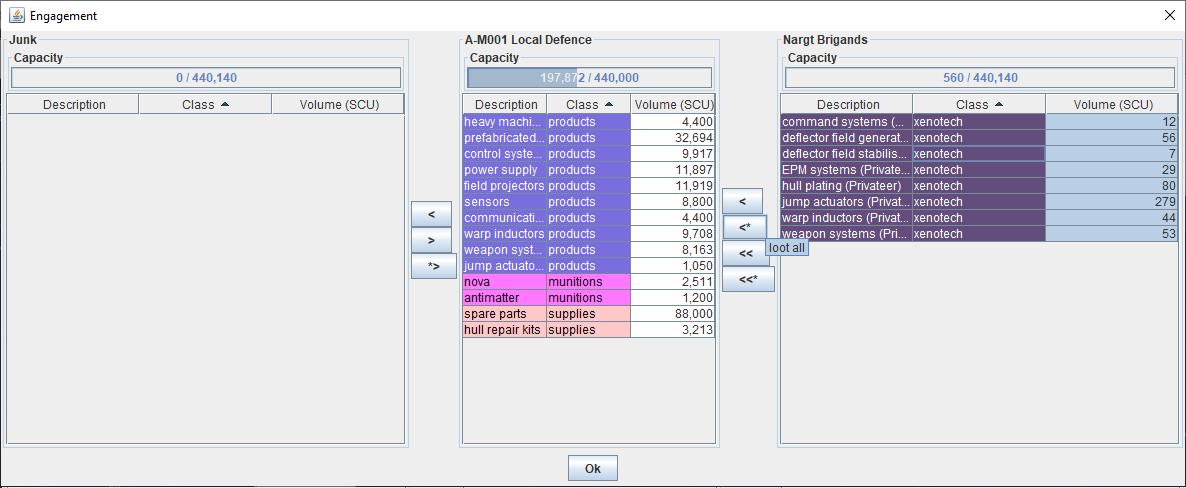
Click [Ok] to formally end the engagement and switch back to real-time. If there are no more threats it is worth spending some time in exploration.
