Exploration
To begin exploring the immediate neighbourhood of your system find some idle ships with jump capability and move them into a new dedicated scout fleet. The initial fleet will come with a naval survey vessel (NSV) which is useful in a scout fleet as it has spatial early warning (SEW) capabilities that detect out-of-system threats and allow visibility into systems within range without the need to enter them. Otherwise, military ships are a good choice for scout fleets as they may find themselves attacked; for similar reasons cargo limits set to Military will ensure the scout fleet has supplies to repair itself if damaged in combat. Regular (non-militarized) cargo ships can always be designated for military use if necessary, but it is often worth queueing up construction of some new NFA class ships to meet future demands.
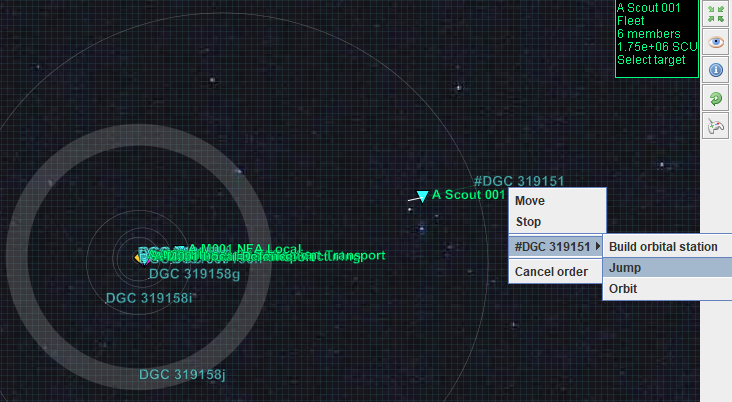
Travelling to other systems via arterial links can be done manually by selecting the scout fleet and using the command ![]() icon and left-clicking an arterial link and selecting Jump. Arterial link jump points have no material presence but exist as a region of space that orbits the primary system star along with every other system body. Note that it is possible to build outposts or leave fleets that orbit these jump points that can interdict hostile fleets using them to enter the system.
icon and left-clicking an arterial link and selecting Jump. Arterial link jump points have no material presence but exist as a region of space that orbits the primary system star along with every other system body. Note that it is possible to build outposts or leave fleets that orbit these jump points that can interdict hostile fleets using them to enter the system.
The quickest way to travel manually is to use the cluster window. Select the fleet in the cluster window and use the command ![]() icon and left-click the desired system and choose Jump.
icon and left-click the desired system and choose Jump.
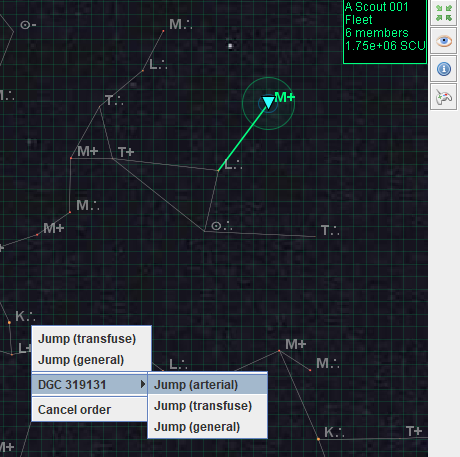
There are three jump modes available.
- Arterial: the fleet will only use arterial links
- Transfuse: the fleet will avoid arterial links and jump via deep-space (usually slower than arterial, except where there is no direct route).
- General: the fleet will try and find the best path to the target (least number of jumps) using both arterial and transfuse jumps.
For star system exploration arterial mode is often the best as it will visit the most systems quickly for any given destination. Once the command is given, the proposed route will be highlighted in green. Note that the target can be a point in deep-space and not necessarily a system itself. This can be useful for reconnaissance of hostile systems using SEW capabilities.
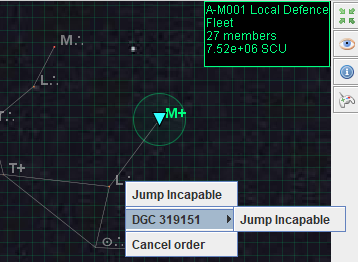
If you select a fleet without jump capabilities the actions will be replaced by the text jump incapable. This means at least some of the members of the fleet are unable to jump, either not having a jump drive at all or having one too damaged to be operational. It may be possible to dock some jump-incapable ships into jump-capable carriers should their have sufficient docking space, otherwise you will need to split the fleet.
At some point you will discover an occupied system.
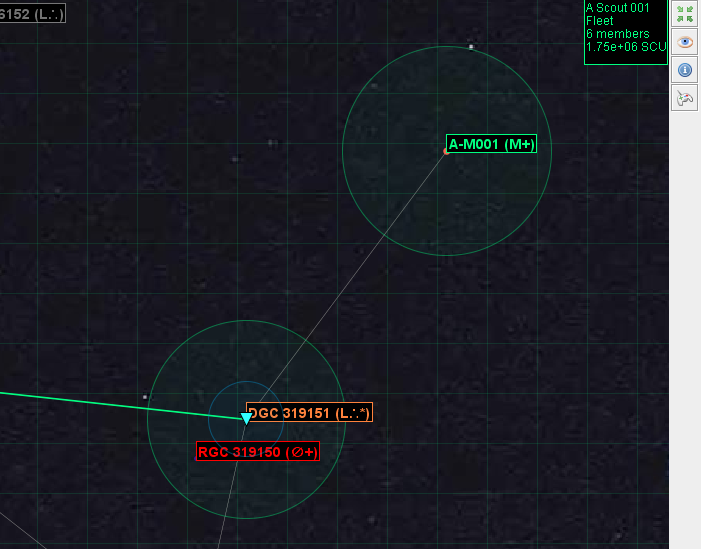
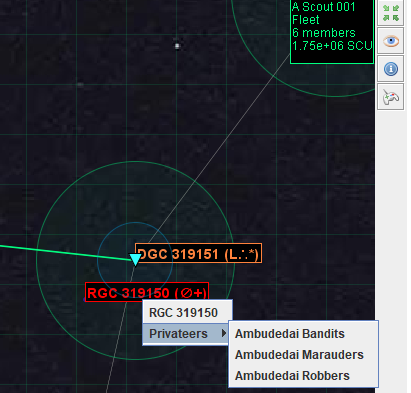
In the example above the first system visited contains a Roamer faction that has been exploiting rare resources unique to that system. The roamer-occupied system is highlighted in orange to indicate that it is not immediately threatening, but may become so.
A more immediate threat is the previously-unseen system marked in red RGC 319150. This is a rogue planet, one without a star. Whilst all star systems in the cluster are easily detectable and known in advance, rogue systems only become known once detected by a fleet with SEW capabilities. The SEW capabilities of the scout fleet below are shown by the green ring (the blue ring is the transfuse jump range). The rogue system being highlighted in red means there are hostile fleets present. As this is within SEW range we can select the fleets by left-clicking the system to list the fleets present. To see the composition of a fleet select it and click the information ![]() icon. Privateer fleets are not associated with any faction and are essentially pirates that can attack, or be attacked without repercussions. Three privateer fleets in this system probably indicates some kind of base and it would be prudent to avoid it with only a weak scout fleet.
icon. Privateer fleets are not associated with any faction and are essentially pirates that can attack, or be attacked without repercussions. Three privateer fleets in this system probably indicates some kind of base and it would be prudent to avoid it with only a weak scout fleet.
As the L-class system we entered contains rare resources it now has an additional asterisk suffix. The type of rare resources can be determined by selecting the system and reading the detail in the top-right corner of the cluster view, or the viewing mode can be changed via the [View] menu by choosing [Remarkable]
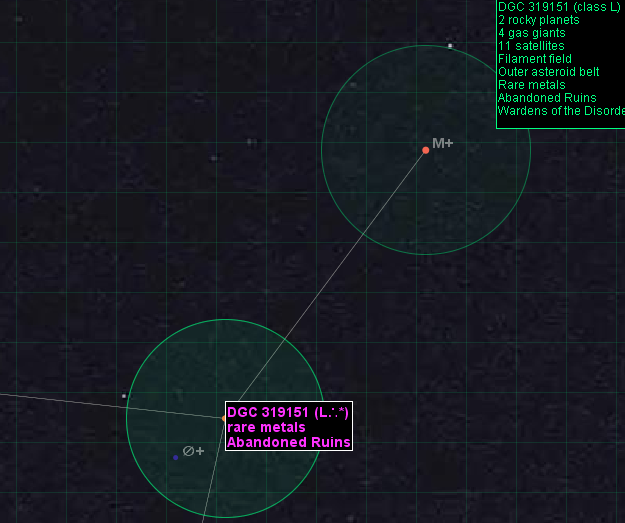
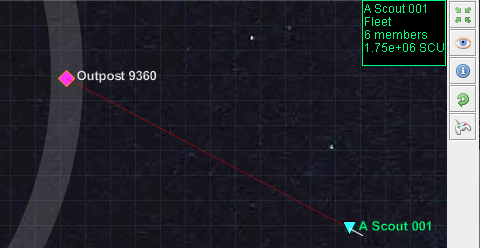
Rare metals are a useful resource that can be used to augment shields in combat and worth taking control of at some point, but the Roamer faction would need to be dealt with first as their colony has monopolized the resource site. Also present in the system are some abandoned ruins which the Roamers are ignoring. These ruins are the remains of past colonies that were abandoned at the end of the millenia-long wars when the neutral zone was created. They can be a useful source of xenotechnology. If your scout fleet has cargo capacity select it and command it to intercept the abandoned ruins outpost. The system display will change to show a red line between the scout fleet and the ruins to indicate its intention to intercept.
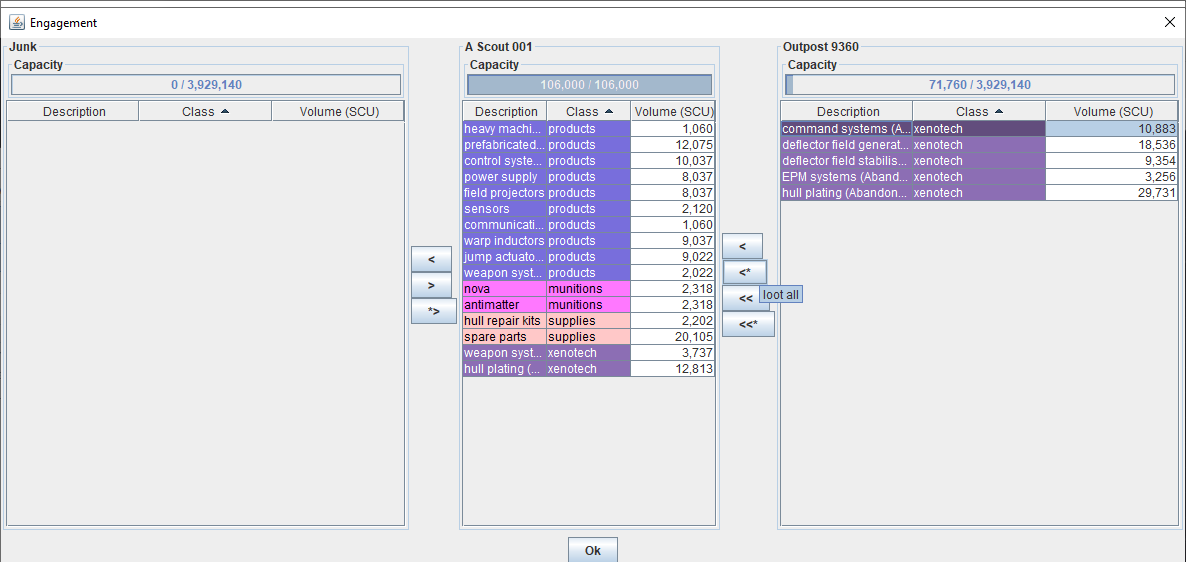
On reaching the target fleet an audible warning will sound, indicating the beginning of a combat engagement. As these are abandoned ruins no resistance is expected so click through to commit your forces. Next you will be taken to the engagement panel. Your fleet is displayed on the left and the foreign fleet on the right. In this case as expected, all the members of the foreign fleet start the engagement already disabled.
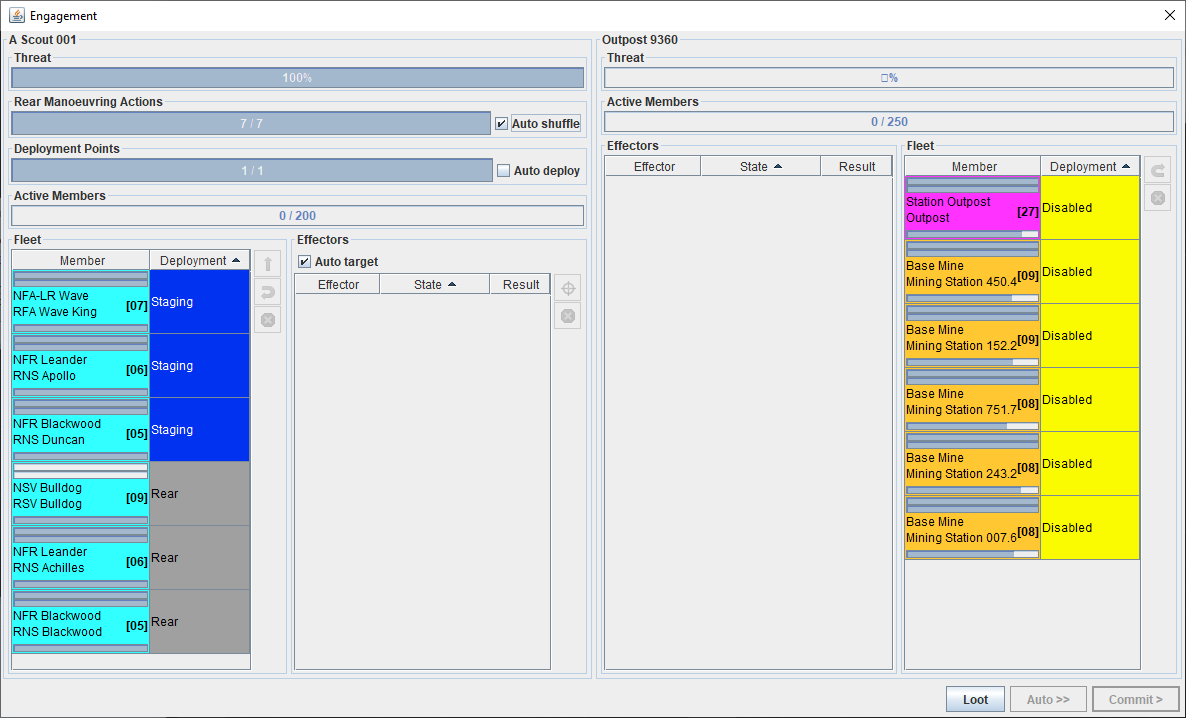
Click the [Loot] button to be taken to a loot panel where you can select items to transfer to your fleet. Occassionally abandoned spaceship hulks can be found within the ruins that with some work can be reanimated. The hulks come with zero equipment or weaponry and need significant modifications to make them mobile again (such as adding equipment bays and building warp and jump engines), but can be worth the effort until you are able to construct large new ships yourself.
The ruins will persist until completely looted, so you do not have to take everything at once.
Building a Hub
Your initial fleet will have a ship with the Research designation. This science vessel has facilities on board for reverse engineering xenotechnology so any acquired tech should be sent back to this ship. By default, a fleet with general manufacturing cargo limits does not allocate any space for xenotechnology so instead we will create a new fleet that will act as a research hub and start building another station. Select the research vessel and move it to a new fleet, with cargo limits Hub. Select the new fleet in the system view panel, click the command ![]() icon then left-click the system’s primary star and select
icon then left-click the system’s primary star and select build orbital station. This will ask the fleet to build an orbital station in the system’s canonical orbit (generally in the middle of the system’s goldilocks zone, where humans would most like to live). When the fleet reaches position, start building a Hub C. The hub structures are designed to be a system’s primary habitation, research, trade, and often even shipbuilding facility. A system may grow to have many manufacturing facilities in the asteroid belts and suitable planets and its often worth consolidating all of this production into a dedicated hub that will later be linked to hubs in adjacent systems to create a classic hub-and-spoke transportation system. At this point you will want to set up an agent to supply the hub with products and spare parts so that construction can begin. Some options are:
- create a new dedicated point-to-point agent.
- customize the existing product delivery agent to have an additional DEST2 variable and associated behaviour to deliver to multiple static destinations.
- change the existing product delivery agent from point-to-point to a service agent that will deliver dynamically as new stations are added.
Now command the scout fleet to Export to the newly created hub and it will drop off its xenotechnology so that research can begin. If you have sufficient capacity, you could set up another agent in the local system that will automatically take xenotechnology from local fleets and drop it off at the hub. The Military cargo limits are built with this in mind as the fleet is always willing to export all of its xenotechnology.
Discovering a Major Faction
The outskirts of the cluster is the neutral zone, set up to separate previously warring factions. Most systems here will be unoccupied, apart from illegal privateers or tolerated roamer companies exploiting rare resources. Scouting systems closer to the centre of the cluster will lead to the discovery of a major faction. A faction message will be received to indicate this, and the clock rate will slow to real time to give you a chance to react. Open the faction diplomacy tab.

Whereas privateers are hostile and Roamer companies are initially obstructive, major factions will tend to start off with an indifferent opinion of your faction. One way to improve this opinion is by making treaties. Select the faction and click the information ![]() icon, then change to the Treaties panel.
icon, then change to the Treaties panel.
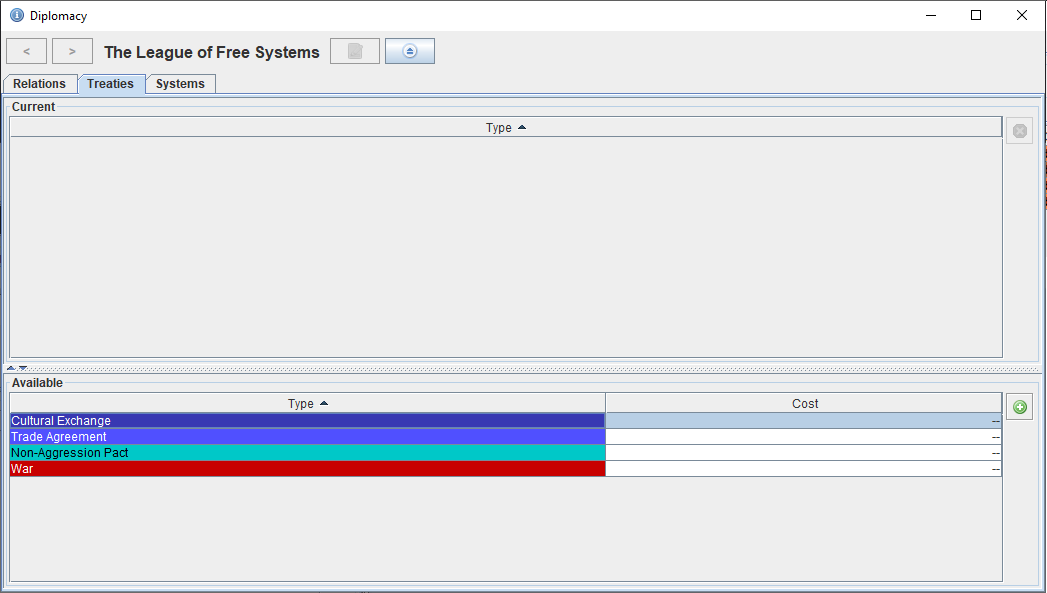
Active treaties are shown in the top part of the window, and available treaties are shown in the lower part. Most treaties are free and can be made simply be selecting them and clicking the add ![]() icon. Hostile treaties are coloured red, neutral treaties are coloured cyan, and friendly treaties are coloured blue.
icon. Hostile treaties are coloured red, neutral treaties are coloured cyan, and friendly treaties are coloured blue.
Agreeing to a non-aggression pact will change your attitude to a faction from Unregulated to Neutral, leading to a colour change of that faction’s systems in the cluster window when the viewing mode is by system attitude. Maintaining a non-aggression pact will slowly increase that faction’s opinion of you over time.
A cultural exchange treaty represents soft power where arts and entertainment from various cultures are shared to build familiarity and perhaps a common understanding of ethics and morality; some autocratic factions may not allow a cultural exchange treaty as they rigidly control what their populations are exposed to. An active cultural exchange treaty will lead to incremental improvements in a faction’s opinion of you.
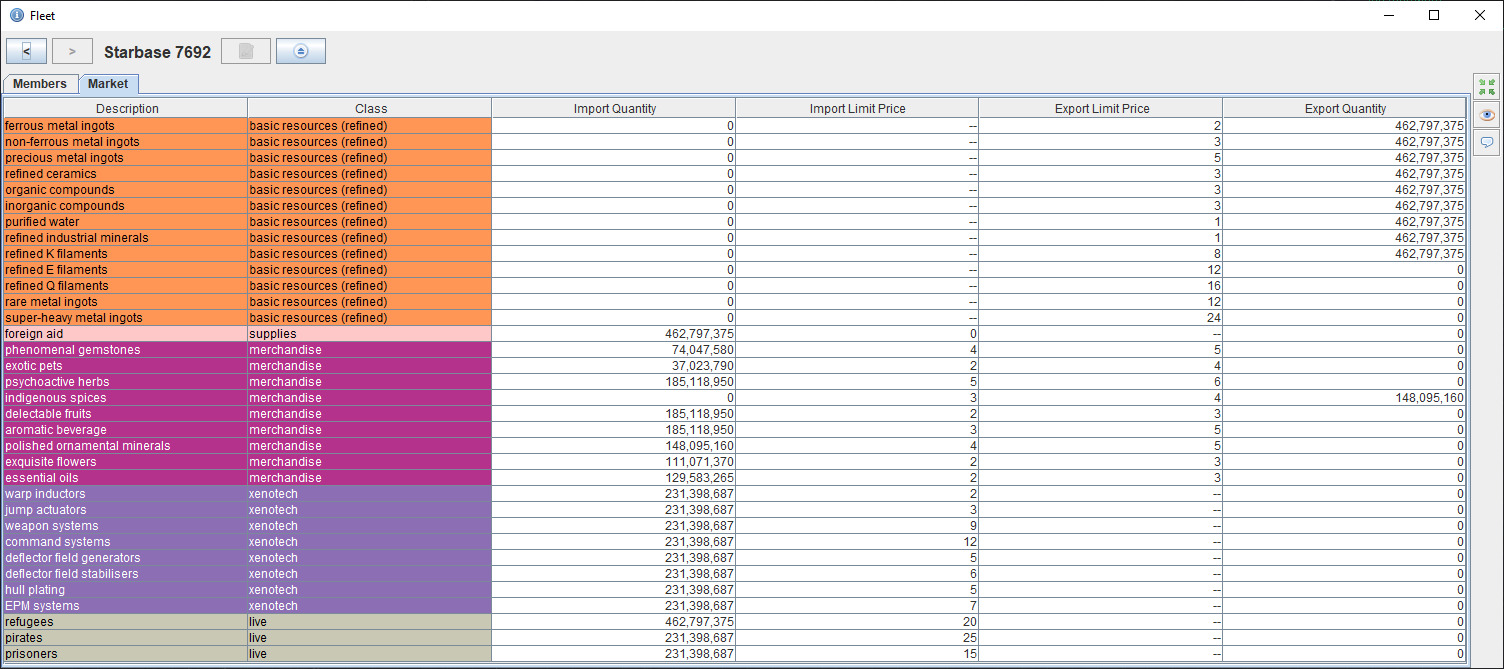
A trade agreement will allow you to trade resources with that faction. Marketplaces are available in hubs owned by that faction. Trading is done via the international exchange currency, Drams. According to legend, Drams were the major currency of a precursor civilization that used units of a precious liquid as a measure of value. Some legends say this civilization raised itself on a desert planet and this liquid was simply water, others refer to a fluid delicacy taken from the bodies of creatures known only as Leviathans. Your current total Drams is shown from the diplomacy tab in the faction window. A peaceful and steady source of Drams is achievable by trading rare luxury goods
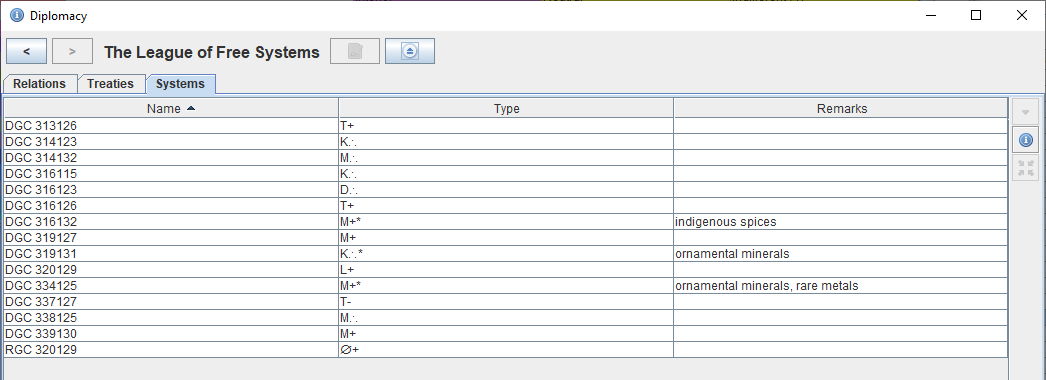
The last [Systems] tab displays information the systems that the faction has occupied that you are aware of.
This concludes the tutorial. Your priority should be to build up your initial system. Once your main manufacturing base has reached a certain size the mobile refineries and extraction ships could be re-purposed to create another manufacturing base either in another asteroid belt, or on one of the inner planets. Although initially limited to one system with permanent settlements, you are able to send mobile miners to exploit resources in other systems as long as you do not build any static bases. With the right combination of mobile extractors, refineries and factories it is easily possible to set up a self-sufficient mobile economy in other systems. Perhaps in time the convocation of major factions will agree to allow you to settle more than one system so it is worth exploring to find somewhere that complements your initial system, such as one containing rare resources if you can muster enough forces to evict any Roamer factions that are monopolizing them.